Skip to content
assostro-header-logo
assistro
  • Integrations
    • Zapier
    • Shopify
    • Hubspot
    • WordPress
    • Chrome Extention
    • Metro Accounting (Coming soon)
    • Flavor CRM (Comming soon)
  • Learn
    • Blog
    • Developer Guide
    • User Guide
    • Tutorial
  • Pricing
  • Contact Us
Get Started

SyncMate

7
  • How to Send Message to a WhatsApp Group – Guide to Fetch Group ID
  • Troubleshooting and Reconnection Guide
  • Connect your Contact Form 7 App with SyncMate
  • Connect your WooCommerce App with SyncMate
  • Connect your HubSpot App with SyncMate
  • Connect your Custom App with SyncMate
  • How to Connect your WhatsApp with SyncMate?
  • How to use SyncMate X Shopify Application ?

Other

6
  • Getting Started with SyncMate and Shopify Integration: A Step-by-Step Guide
  • After Installation : Setting up SyncMate Chrome Extension
  • Assistro Dashboard
  • How to use SyncMate in a 3rd Party application via OAuth – The Secure way
  • How to back up your WhatsApp chats in HubSpot?
  • SyncMate User Guide: Regenerating Your Token

Extension

3
  • Bulk messaging at a scheduled time using SyncMate
  • Send Message at a scheduled time using SyncMate
  • Define your own template to send schedule message
View Categories
  • Home
  • user-guide
  • Theme Installation

Theme Installation

1 min read

Extract the zipped package downloaded from ThemeForest to your desktop, in the extracted package you will find the landpagy.zip (landpagy_main.zip) file which is the WordPress theme.

You can install the theme in two ways:

Upload Method #

1. Navigate to Appearance > Themes. #

Log in to your WordPress dashboard and go to Appearance in the menu on the left of the dashboard and select Themes.
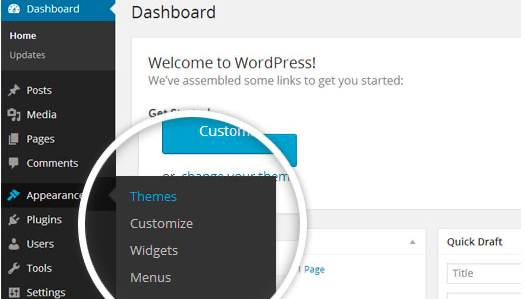
Using the WordPress dashboard to get to the themes.
Image Source

2. On the themes page, select Add New at the top of the page. #
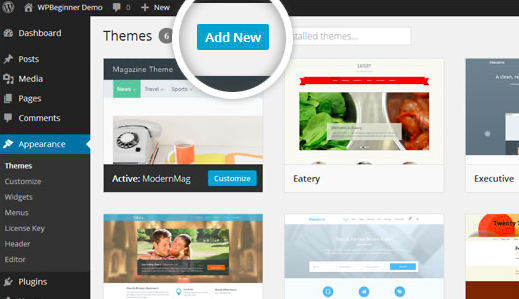
Add New button to upload a WordPress theme.
Image Source

3. After clicking on the Add New button, select the Upload Theme button. #
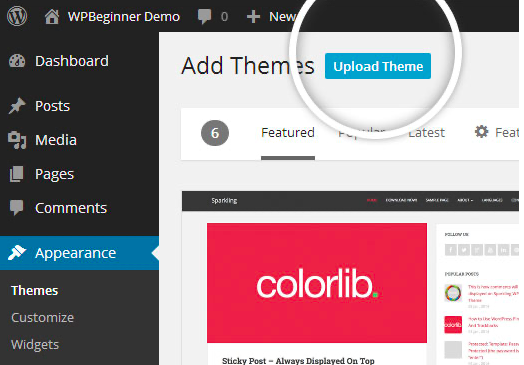
Upload Theme button to upload your own theme on a WordPress site.
Image Source

4. Upload and install the file. #

After selecting Upload Theme, click Choose File. Select the theme .zip folder you’ve downloaded, then click Install Now.
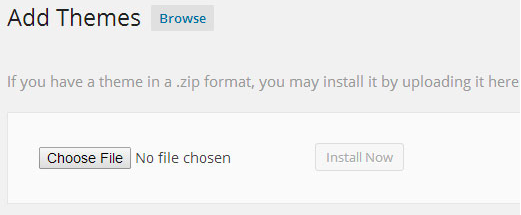
Choose a file to upload your theme on WordPress.
Image Source

5. Click Activate once complete. #

After clicking Install, a message will appear that the theme installation was successful. Click Activate to make the theme live on your website.
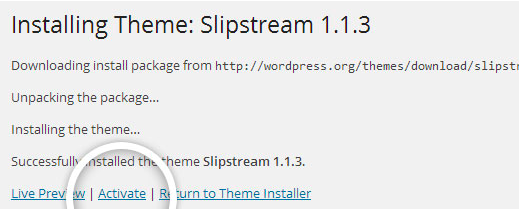
Successful installation message after uploading a WordPress theme.

FTP Method #

If you can not install the theme by following the above method, you can try this method.

1. Download FTP Client to your computer. #

To begin this process, you will need to download an FTP Client to your computer. This is a software tool that allows you to access and add or delete files on your website server.

2. Create an FTP account through your hosting provider. #

Next, you’ll need to gain access to your hosting provider account through the FTP Client. Usually, you will have to set up your own FTP user account within your hosting dashboard, however, it is a different process for every hosting provider. Typically, the hosting provider gives you a username and password when you make a new account, which you’ll need when creating your FTP Client account.

3. Download your theme and unzip the file. #

If you don’t already have your theme file downloaded to your computer, download it now. Certain companies provide more in the download folder than you need to upload your theme, so be sure to just download the .zip file. Once you’ve downloaded your files, you’ll need to unzip and compress your file. You can do this by simply right-clicking the .zip file, then selecting Extract.

4. Upload the theme folder to WordPress to install. #

Within the FTP Client, find the root of your WordPress install. Next, go into the wp-content folder, and select Themes. Upload the entire folder you unzipped here.
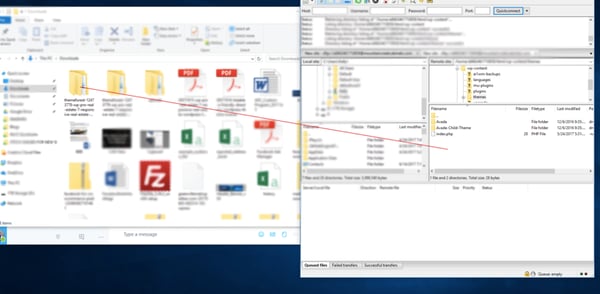
Choosing a theme within the FTP client.

Image Source

5. Activate the theme from your WordPress dashboard. #

After uploading the theme, you have to activate it. Navigate to [direction]Appearance > Themes[/direction] page to activate the theme. You should see your new theme as an option under your downloaded themes. Select the new theme and click Activate to make the theme live on your website.
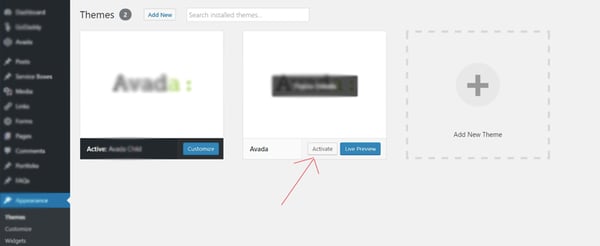
Activating a FTP theme on WordPress.
Updated on August 29, 2025

What are your Feelings

  • Happy
  • Normal
  • Sad
Share This Article :
  • Facebook
  • X
  • LinkedIn
  • Pinterest

Leave a Reply Cancel reply

Your email address will not be published. Required fields are marked *

Table of Contents
  • Upload Method
    • 1. Navigate to Appearance > Themes.
    • 2. On the themes page, select Add New at the top of the page.
    • 3. After clicking on the Add New button, select the Upload Theme button.
    • 4. Upload and install the file.
    • 5. Click Activate once complete.
  • FTP Method
    • 1. Download FTP Client to your computer.
    • 2. Create an FTP account through your hosting provider.
    • 3. Download your theme and unzip the file.
    • 4. Upload the theme folder to WordPress to install.
    • 5. Activate the theme from your WordPress dashboard.
assistro

We’re your innovation partner, delivering cutting-edge solutions that elevate your business to the next level.


    Navigation

    • Integrations
    • Pricing
    • Contact Us

    Integrations

    • Zapier
    • Shopify
    • Hubspot
    • Wordpress
    • Chrome Extension
    • Metro Accounting [Coming soon]
    • Flavor CRM [Coming soon]

    Learn 

    • Blogs
    • Developers
    • User Guide
    • Tutorials

    © Copyright 2025, All Rights Reserved by Assistro